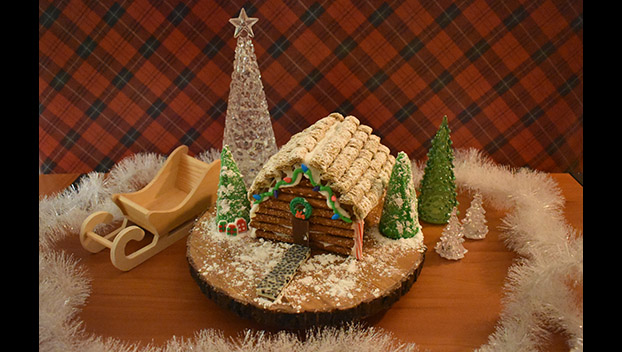
The Christmas cabin: A showstopper gingerbread house
Published 8:00 am Thursday, December 23, 2021

Above, while a store bought gingerbread house kit may come with some decorations, be sure to pick up a few extra items, such as candy bars, cereal and sprinkles, in order to take things up a notch.

When adding heavy decorations to your gingerbread house, it’s important to be generous with the amount of icing holding the whole thing together.

Finishing touches will add that extra-special somethin’ to your gingerbread house display. Turn some ice cream cones upside down and coat them in green icing, powdered sugar and sprinkles for beauti- ful, snow dusted trees. Use the underside of a cookies n’ cream chocolate bar as a tiny stone walkway leading up to the cabin.
|
Getting your Trinity Audio player ready...
|
The holidays come with many treasured traditions, and one of my favorites has got to be making and decorating a gingerbread house. Since high school, I have always enjoyed grabbing a friend or loved one and forcing them to spend hours around the dinner table using icing to glue gumdrops and candy canes to a tiny house made of cookies. With years of practice, I have through trial and error come up with what I believe to be a showstopper gingerbread house like no other. It is always sure to wow guests as a centerpiece during Christmas dinner, and it quickly becomes a staple in your holiday decor.
Thumbing through the next few pages, you will find instructions on how to create a Christmas cabin gingerbread house. Complete with pretzel “logs” and a thatched roof made from frosted cereal, this beautiful creation will have you winning the family gingerbread house competition by a mile. Make it a group project with your children or grandchildren, or put on some holiday tunes and take a stab at it all on your own.
You will need:
• A gingerbread house kit
• Green icing
• Large pretzel sticks
• Candy canes
• Waffle cones
• Kellogg’s Frosted Mini Wheats
• A milk chocolate bar
• A cookies n’ cream chocolate bar
• White sprinkles
• Multicolored sprinkles
• Powdered sugar
• Assorted candies
HOW TO BUILD YOUR CHRISTMAS CABIN:
The first thing you will need when crafting your Christmas cabin, of course, is a gingerbread house. Feel free to make your house from scratch, but I’m a bit of an impatient person and was slightly appalled last year when it took nearly half a day to make gingerbread cookies from scratch. If you’d rather skip straight to the decorating, there’s no shame in buying a pre-baked house from your local supermarket. These houses come with pre-cut pieces to construct the house, plus icing and some small decorations which I tend not to use.
If you do choose to make your own gingerbread house, be sure to make more dough than you think you’ll need should something go wrong. To glue your pieces together, you’ll need royal icing, and for decoration, make sure to use a crusting buttercream that will dry quickly. (I like the all-in-one recipe from Sally’s Baking Addiction, which can be found at https://sallysbakingaddiction.com/gingerbread-house/.)
To begin decorating, put on your favorite holiday movie and clear off the table. The first thing you must do is assemble your gingerbread house. If you bought a kit in the store, follow the directions and use the provided icing to “glue” the house together. We are putting a lot of heavy decorations on this house, so be sure to be generous with your glue.
Gingerbread house kits will often come with a small cardboard base to build the house upon, but I’ve found that a Lazy Susan makes for the best base as it allows you to rotate your project with ease. For this house, I’ve used an adorable rotating cake display made to look like a round and rustic slice of wood. It’s absolutely perfect for the vibe we are going for.
Once your house and icing are dry, begin adding your “logs” to the log cabin by using more royal icing to glue the pretzel rods to each side of the house. You will likely need to nibble on the ends of the pretzel sticks in order to make them fit the length of your house’s walls. If you’re on a diet, ask a friend to nibble them for you. Cutting the pretzels tends to cause them to break.
After gluing the pretzel logs all the way up the sides of your house, it’s time to start on the roof. Breakfast cereal makes for an amazing gingerbread house roof, as the little squares look just like roof tiles. For this recipe, we’re using Kellog’s Frosted Mini Wheats, which look exactly like an old-fashioned thatch roof covered in a dusting of snow. This trick has won me many holiday baking contests in the past.
Place the Mini Wheats on your roof starting at the bottom, allowing for some overhang. When starting a new row, place the cereal pieces in such a way that one row slightly overlaps the top of the row underneath it. This gives a much more realistic roof effect.
After finishing the walls and roof of the home, be sure to fill in any cracks or crevices with more icing.
Now comes the fun part. At this stage in the process, you can accessorize your gingerbread house with a variety of different candies and other sweets. I’ve used green icing and multicolored sprinkles to replicate a string of lights across the roof. I also found a very cute, tiny wreath made out of candy to place above a door made out of a Hershey’s chocolate square. Candy canes, when snapped in half, make for an excellent column on either side of the home.
For our Christmas cabin, I’ve added some particularly cute touches. A new trick I’ve learned is to take pointed waffle cones and use a butter knife to apply a thin layer of green icing. Dust the cones with white, sparkly sprinkles and powdered sugar to give off an amazing snow-coated pine tree effect. A cookies n’ cream chocolate bar flipped upside down makes for the perfect stone walkway leading up to the door.
For a charming finishing touch, dust your display with a light layer of powdered sugar and more glittery, white sprinkles to replicate some freshly fallen snow. This gorgeous gingerbread house, if left unbothered by a house cat and out of the sun, will remain beautiful well into January.